
If you’re passionate about broadcasting engaging and visually appealing Twitch or Steam live streams, then a green screen is the obvious choice. Not sure where to begin with or confused by all the mixed information on social media? No need to worry!
In this guide, we’ll walk you through setting up a green screen backdrop and explain all the ways to use the chroma key technique for live streaming. We’ll also give you a quick tutorial on chroma-keying in OBS Studio and list the common mistakes beginners make, explaining how to avoid them.
Without any further ado, let’s dive straight in!
How to Stream with a Green Screen – A Quick Guide
- Set up your green screen kit, camera, and lighting equipment
- Open your broadcasting (or green screen) software
- Adjust the chroma-keying settings inside the software to enable green screen streaming
- Select and adjust your preferred background
- Test run the stream
- Go live
What is a Green Screen for Streaming?
A green screen is a sheet of green fabric used in live streams and videos-on-demand (VODs). It’s suspended in the back settings, allowing content creators to add a custom image or video to their broadcast as a virtual background.

- Instant Immersion: portable chroma key panel optimized for webcam background removal.
- Superior Screen: durable wrinkle-resistant fabric guarantees the cleanest key you can get.
- Pop-Up Tech: simply lift and let the pneumatic x-frame automatically lock the screen in place.
- Concealable Design: retract into the aluminum hard case and stash out of sight.
- Ultra-quick setup and teardown
Is a Green Screen and Chroma Key the Same Thing?
A green screen is a sheet of green cloth that serves as the backdrop of a frame. In contrast, chroma-keying is the actual technique used to replace the green color of the screen with a different background.
In short, the green screen is a blank canvas, while the chroma key is the process of digitally filling that canvas with an image or video.
How Does a Green Screen Work for Streaming?
A green screen provides a uniform color backdrop that can be easily replaced with other images or videos. First, the camera captures both the subject and the green screen background. Next, the chroma-keying software compares each pixel’s color value to a predefined range of green hues. Finally, the software digitally replaces green pixels with either a static or a live green screen background.
The process results in a composite video where the subject appears in a different location or environment than originally filmed in.
Does It Matter What Color a Green Screen Is?
Yes. The color of the screen does matter when it comes to chroma-keying. Green and blue screens are commonly used as backdrops because these colors are farthest away from human skin tones. This helps the chroma key software easily differentiate between the subject and the background, reducing the risk of any potential visual artifacts.
Why Use Green Screen for Streaming
There are several reasons to use a green screen for streaming:
- Green screens allow you to replace your streaming background with any image or video you like, giving you full creative freedom and flexibility.
- Green screens are quite inexpensive and save you the cost of building a set or studio for filming.
- Green screens help maintain a consistent setting across your broadcasts, even if you’re filming from different locations.
- Green screens are necessary for adding visual effects and overlays, making your content more aesthetically pleasing.
- Green screens give your live broadcasts a more polished and professional look.
What Do You Need for a Green Screen Streaming Setup?
To set up a green screen for streaming, you’ll need the following equipment and tools:
- A green screen backdrop or a pop-up
- Backlights, key lights, and fill lights
- A good quality 1080p webcam or a DSLR
- A dynamic or condenser mic with a cardioid polar pattern
- A PC or laptop with a dedicated GPU
- A broadcasting software with chroma key
Can You Just Use a Green Paper for Green Screen?
Yes, you can use green paper or a DIY green screen for streaming. However, it may be less effective than a professional green screen backdrop. Paper tends to be more reflective than fabric and may cause chroma-keying problems.

How to Set Up a Green Screen for Streaming
Setting up a green screen kit for streaming requires careful planning and attention to detail. In this section, we’ll discuss everything you need to pull off a perfect green screen setup.
Step #1: Get the Green Screen Kit and Streaming Equipment Ready
While green screens are commonly used, you can also use a blue screen if you want to wear green on-screen or showcase a green product.
To hang the screen, use clamps and tighten any wrinkles. If the screen is particularly wrinkly, steam or iron it. Ensure the green screen has no hot spots or uneven lighting.
How to light a green screen for streaming?
The 3-point lighting setup is the best green screen lighting setup for streaming. This setup consists of three lights:
- Key Light: This is your primary light source. The key light is typically placed at roughly a 25 to 30-degree angle from the subject (you) in front of the green screen. It’s placed at an angle to create a better separation between you and the green screen.
- Back Light: As the name implies, the backlight is placed behind the subject at roughly 3 feet. It should point toward the back of your head, hence why it’s also called the ‘Hair Light.’
- Fill Light: Lastly, place the fill light on the opposite side of the key light to “fill” the dark side of the subject, particularly your face. You can also use a reflector screen to bounce the key light from a different angle toward you.
How far away should a green screen be?
You should sit or stand at a distance of at least 3 to 5 feet from the green screen. If you observe shadows getting casted on the green screen or a “spill”, then you’re probably standing too close to it.
What is “spill” in chroma?
‘Spill’ refers to the ambient green light the green screen reflects onto the subject. You don’t want any spillage onto you as it confuses the chroma-key algorithm. The farther away you are from the green screen, the less spillage the camera will pick up.

Set Up the Camera
Once your green screen kit is ready, it’s time to set up your camera, preferably on a tripod. The tripod will allow for a clean and easy chroma key with no additional variables such as camera sway or shake.
What are the best camera settings for a green screen?
For the best results, use a resolution of at least 720p. But ideally, you should aim for a 1080p resolution with minimal video compression.
What is the best shutter speed for a green screen?
1/125 is the ideal shutter speed to use with a green screen. This will reduce motion blur and help the chroma key software differentiate the subject’s edges better.
Additionally, use a camera lens with an aperture of F/4.0. This will give your recording a natural bokeh effect and help minimize any wrinkles in the green screen. Lastly, keep the ISO low to avoid noise and film grain. An ISO of 400 is recommended.
If the footage feels too underexposed in the test run:
- Use a lens with a wider F/2.8 aperture to let more light into the camera lens
- Use a slower shutter speed but try not to go below 1/80 to avoid motion blur
- Use brighter studio lights to help the camera “see” better
- If nothing helps, use a higher ISO value as a last resort. You can go up to ISO 600 or even 800 without too much noise, but ideally, you should stick with ISO 400 to avoid grainy footage
Choosing the Microphone
Use a cardioid polar pattern mic, as it captures audio from the front and cancels residual background noise. The mic can be either dynamic or condenser, depending on the nature of your content.
If you want to record instruments, we recommend using a condenser mic because of its superior high-ends. Otherwise, a dynamic mic is ideal in most situations because of its superior lows and mids.
Do You Need a Computer to Use a Green Screen?
You’ll need a PC to run chroma key software. Fortunately, you don’t need a top-end gaming PC as even mid-range systems are powerful enough to chroma key your broadcast.
Gear recommendations:
- Looking for what green screen kit to buy? Based on our experience, the Elgato Green Screen is the best green screen for streaming. It’s available in both collapsible and wall ceiling mounts, depending on your preference. You also get a portable roller case to keep the green screen crease and wrinkle free while in storage.
- Take a look at our list of the best webcam for live streaming. We highly recommend the Canon XA10 Professional Camcorder because of its eight-blade iris and full manual focus.
- For lighting, we recommend the Linco Studio Light Kit. It features 4 x 75” light stands, 2 x white umbrella deflectors, 4 x Mini-Cirrus light holders, and a premium carrying bag for the entire lighting kit.
- For mics, check out our list of the Top 10 best microphones for streaming. The best mic for streaming is the legendary Shure MV7. It’s a USB/XLR hybrid and commonly used by popular YouTubers and Twitch streamers alike.
- Finally, take a look at our best 2023 PC builds under $1,000 guide to find the right PC and hardware for your green screen streaming needs.
Step #2: Download a Good Green Screen Software
Now that you’ve set up your green screen kit and other streaming equipment, the next thing you need is a green screen software.
What Green Screen App Do Most Streamers Use?
OBS Studio is a popular choice among top streamers. It’s an open-source, free green screen software and can be used for green screen streaming on Steam, Twitch, YouTube etc.
Xsplit Broadcaster is another valid option. However, it’s a ‘freemium’ product that costs $60 for the base Broadcaster Premium package and $70 for the full premium bundle with no restrictions. The free plan is limited to just 4 scenes and also adds a watermark to your videos.
For what it’s worth, we prefer using OBS Studio because it gives you full functionality and requires no signup fee.
To install OBS, head to their official website and select the operating system you’re using to download the software. Once completed, run the setup to install OBS Studio onto your PC.
Step #3: Adjust the Broadcasting Software Chroma Key Settings
We’ll use OBS as our preferred green screen software for this guide. If you are using some other app, you can search for the set up tutorial on YouTube or Google. You can even look up on the company’s website to find the relevant information.
Let’s learn how to set up the chroma key inside OBS studio:
- Open OBS Studio on your PC
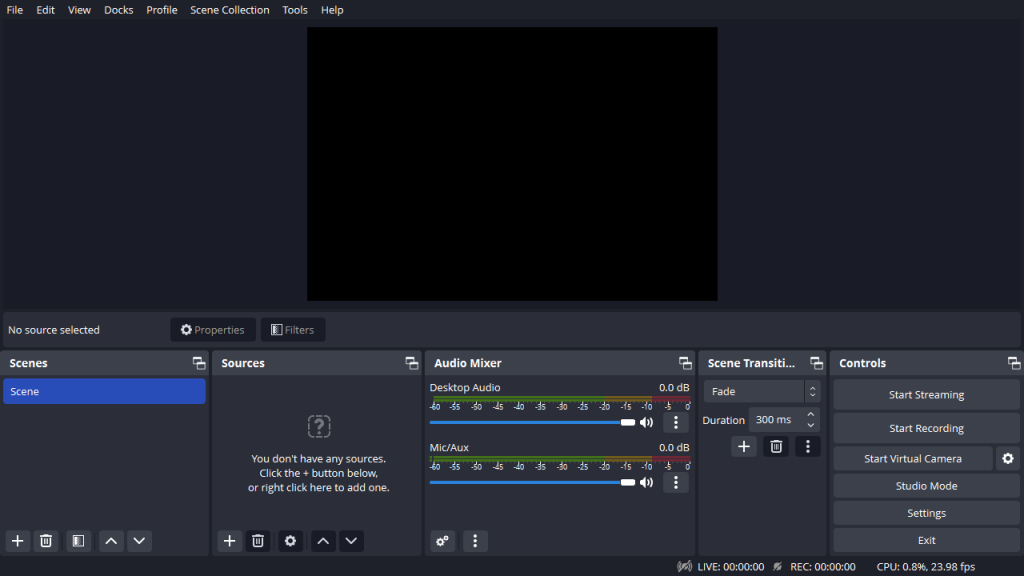
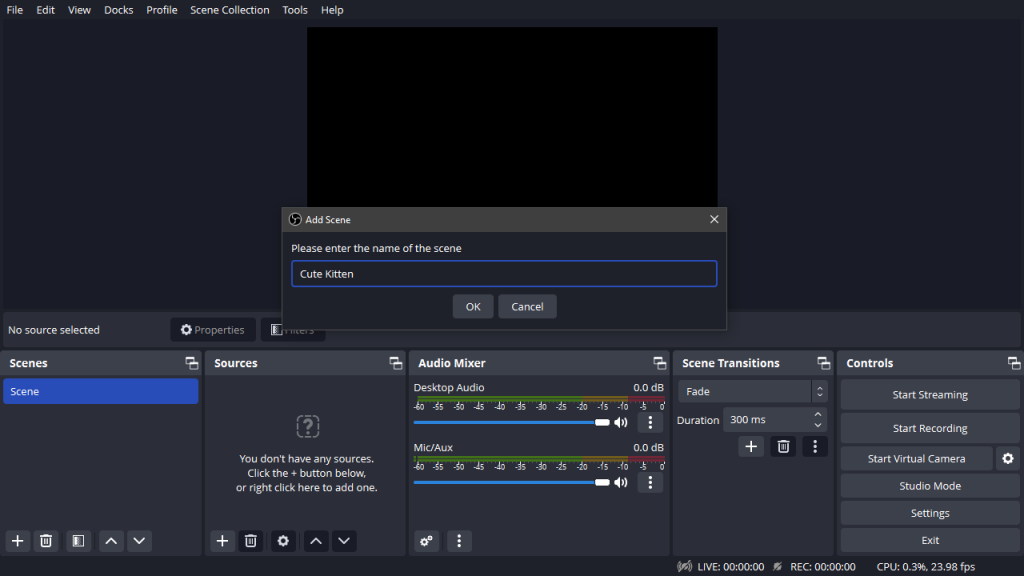
- Start by adding a new scene. To do that, go to the Scenes section located at the bottom left of the main screen and click on the “+” icon. Add the scene name. You can pick whatever you like
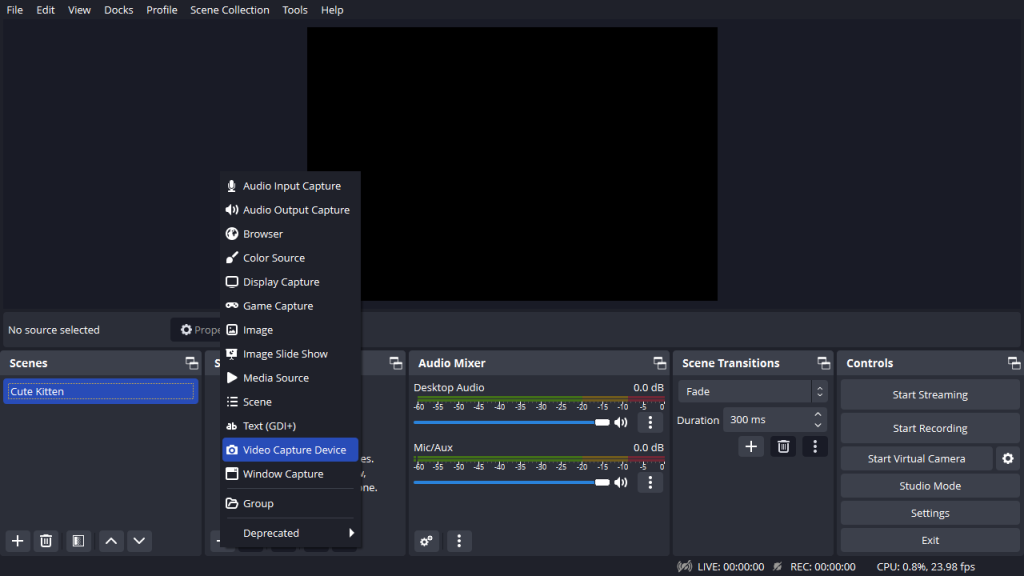
- Once you’ve added the scene, head over to the sources section, click the “+” icon, and choose “Video Capture Device”
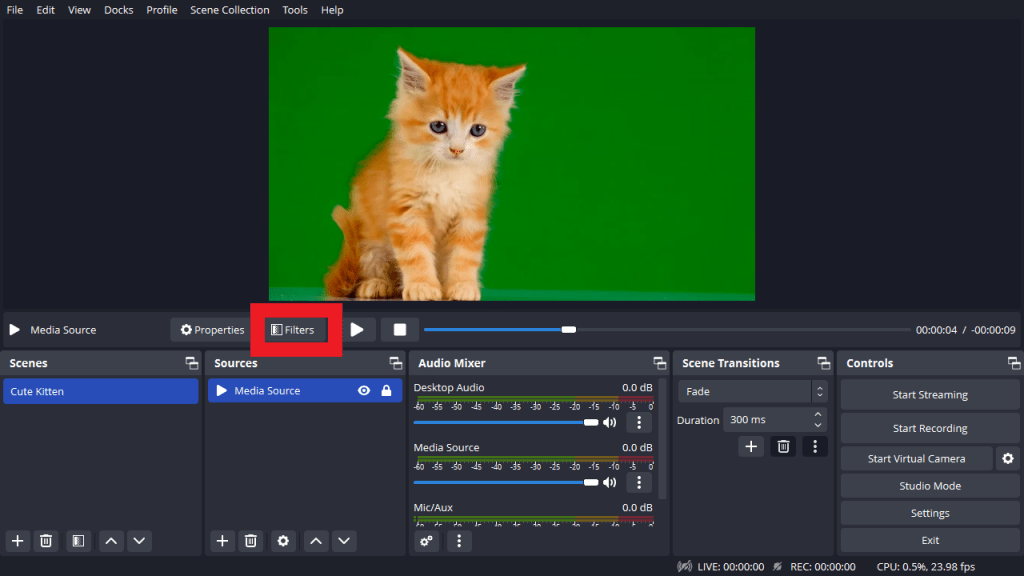
- You should be able to see the video feed coming from the capture device. Click on the Filters button, located just above the Sources section
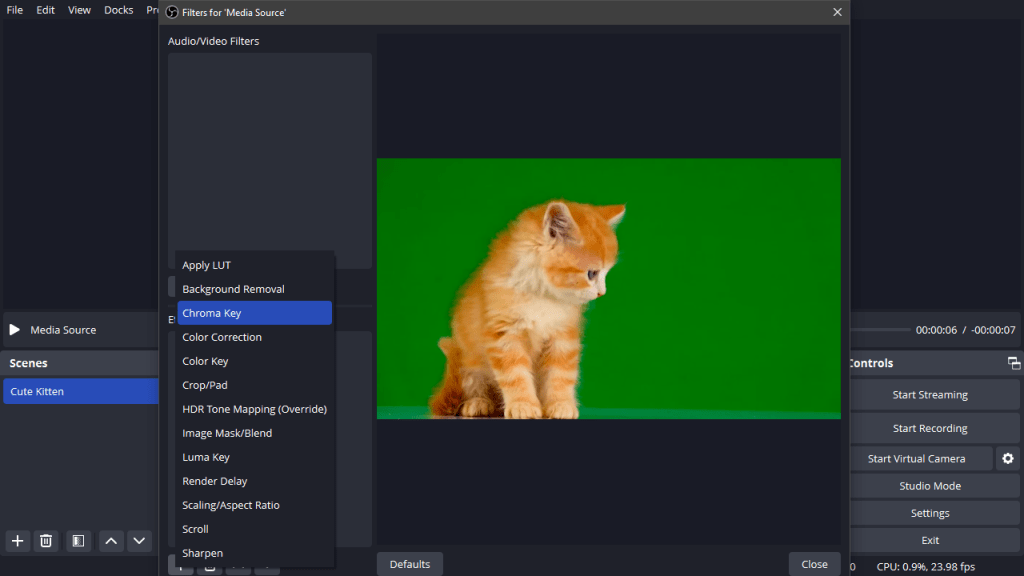
- In the next window, click the “+” button located under the ‘Effects Filter’ and select ‘Chroma Key’
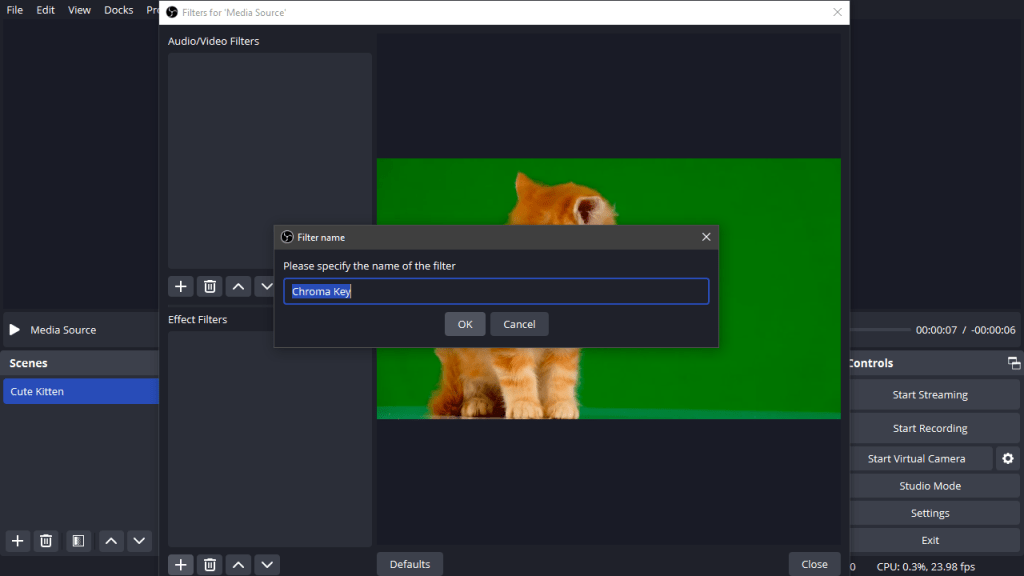
- You’ll be prompted to specify the name of the filter. Simply leave it as it is, or rename it if you wish. Once done, click ‘OK’ to proceed
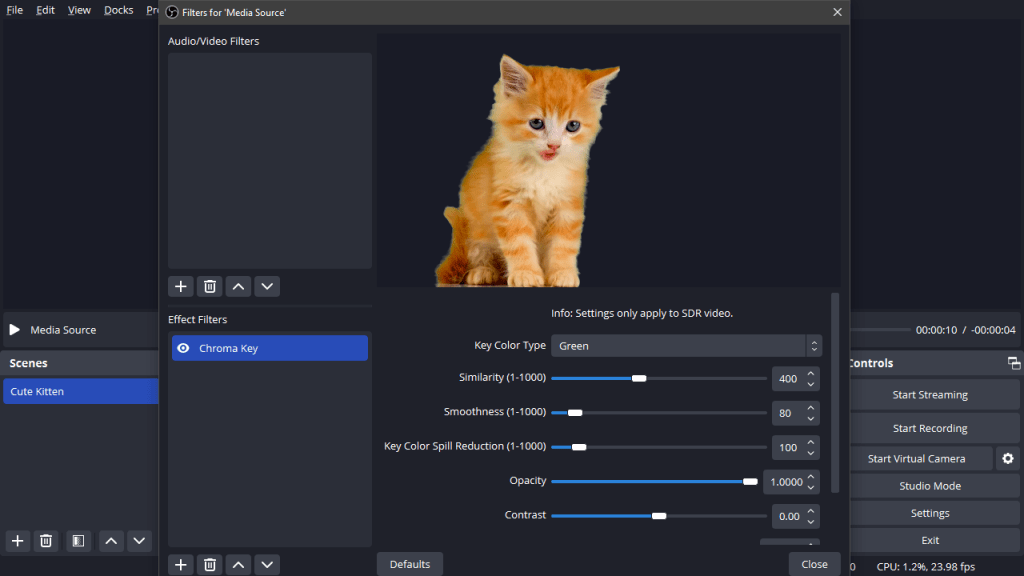
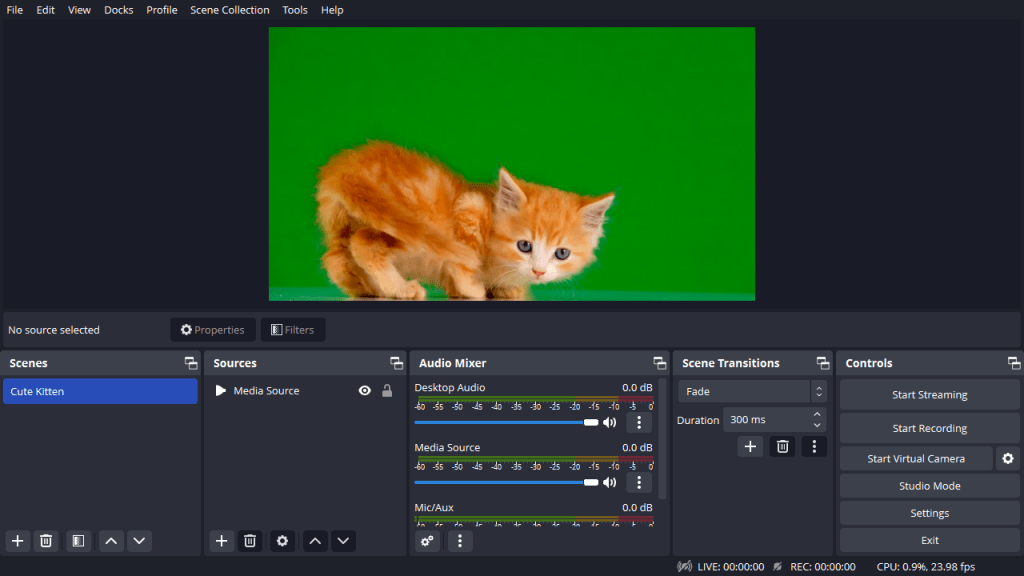
- While the OBS Studio has done a fantastic job of removing the background, it’s not perfect. If you look closely, you can see a slight green hue on the edges of the kitten’s fur
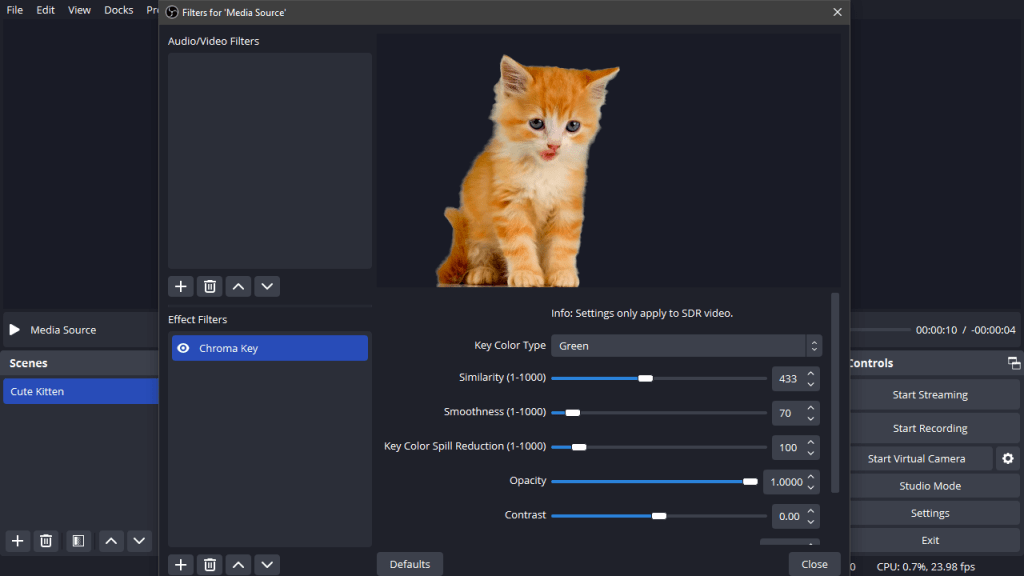
- To fix it, start by slowly moving the ‘Similarity’ slider to the right. In this example, we went from 400 to 433. But the chroma key still wasn’t great, so we lowered the ‘Smoothness’ value from 80 to 70. Now, it looks just about ‘purrfect’
And you are almost there! Just need to add a missing background of your choice before you can run a test stream and go live.
By the way, if you’re planning to stream on Twitch, you can also use Twitch’s very own broadcasting software, Twitch Studio, for the green screen live stream setup.
Just like OBS Studio, Twitch Studio allows you to apply chroma-keying to your live streams and add a video or a static image in the background.
How to Set Up Green Screen Inside Twitch
To set up a green screen inside Twitch, first install the Twitch Studio app. You can find the latest version of Twitch Studio right here. Once you’ve downloaded and installed the app, click on ‘Webcam’ and select ‘Chroma Key’ from the right-hand pane. To optimize the Chroma Key, select ‘Edit Chroma Key’ and use the ‘Similarity,’ ‘Edge Transparency,’ and ‘Edge Color Correction’ sliders.
Step #4: Choose a Background
While there’s no shortage of free green screen backgrounds for streaming, choosing the right background is crucial.
- Consider the purpose of your stream. If you’re live streaming a game, your game screen should be the background. But for commentary or a podcast, a formal, static background is recommended.
- Pick a background with a low contrast between objects such as furniture, decoration pieces, plants, lamps, etc. This is because the human eye is naturally drawn toward objects with a high contrast and saturation. Whereas, in the case of streaming, your goal should be to draw the audience’s attention to yourself.
- Adjust the lighting and shadows to match the background. This will ensure you don’t look out of place in front of the chroma-keyed background.
- Once you’ve added the background layer, adjust its size and position until everything is perfectly in the frame.
- Ensure that the resolution of your background matches your camera’s resolution. If you’re shooting at 1080p and the background is only 720p, it will make your stream look unprofessional.
- Lastly, apply a slight blur to the background to give your footage depth and a slight bokeh effect. This will also help mask any inconsistencies in the shadows, color temperature, and lighting between yourself and the background.
Continuing with our green screen setup inside OBS from where we left off in the last section:
- Navigate to the main screen, select the “+” button again under the ‘Sources’ section, and click on ‘Image’
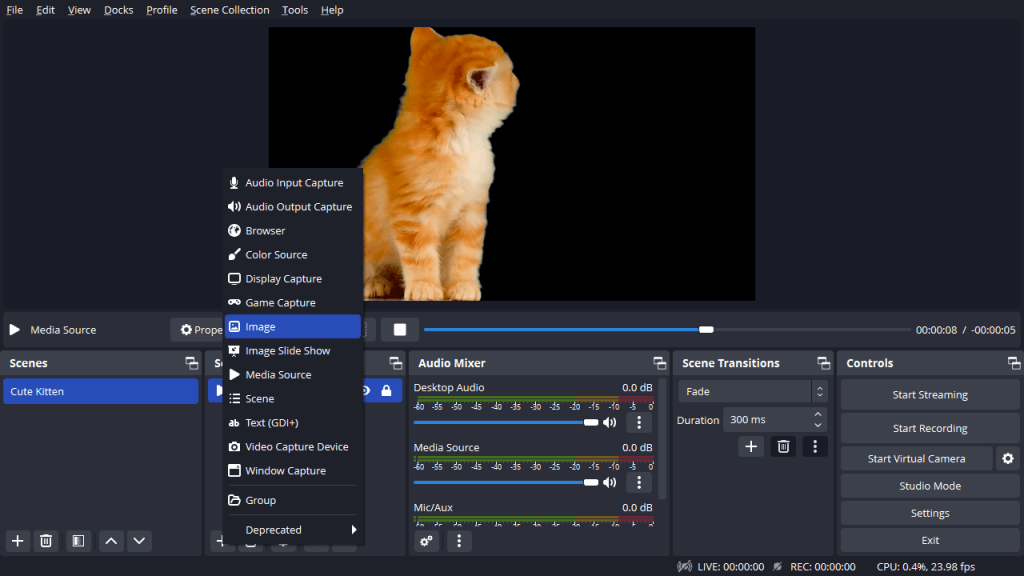
- Browse to your preferred background image file, select the file, and hit ‘OK’

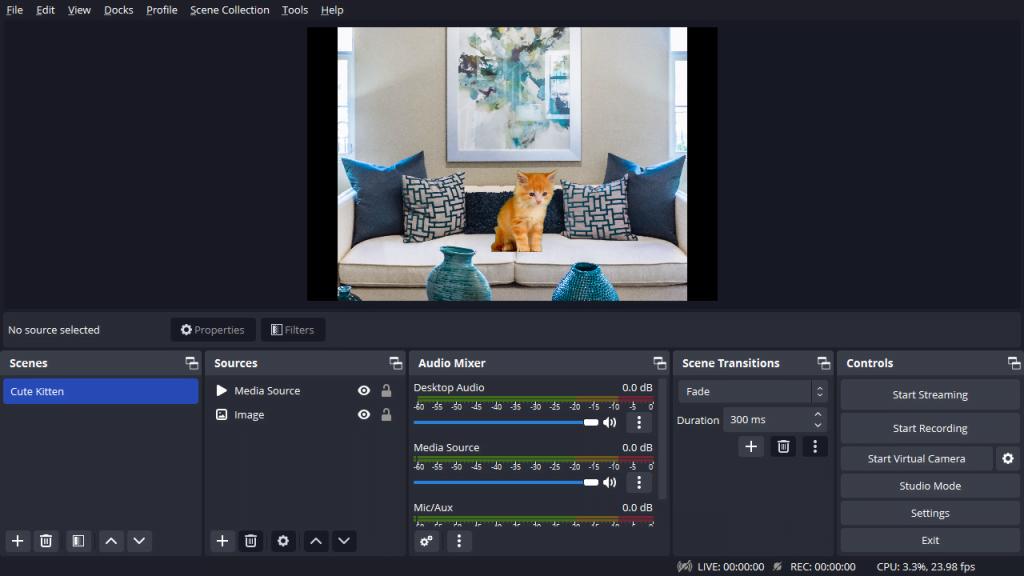
- Finally, stack the background image and video output on top of each other to complete the process
Step #5: Perform a Test Run
Performing a test run helps you identify any potential issues in your stream and make necessary adjustments to ensure a good presentation.
Check the lighting and shadows. Carefully look for any visual inconsistencies or chroma key artifacts. Remember, correcting mistakes while running a test stream is much easier than in live settings or post-production.
Step #6: Go Live with Your Broadcast
Once everything’s done, it’s time to go live. To go live in OBS Studio, click on ‘Stream’ and select your preferred streaming platform from the Service drop-down menu. In the example below, we’ve selected Twitch. Click ‘Connect Account.’ In the Twitch Log-in window, input your credentials and select ‘Log-In.’

And that’s it, you’re live!
Once you’re broadcasting, you cannot do much from this point onward. So, just focus on your stream and if, by any chance, you notice some visual artifacts in chroma-keying, don’t panic!
Instead, bring the issue to your audience’s attention and try to explain your situation. If the problem is particularly serious, you can take a quick pause to fix the issue and attribute it to technical difficulties.
How to Get Rid of Your Background without Green Screen When Streaming
There are several software that can remove background without green screen, namely CyberLink PowerDirector, Apple iMovie, and Adobe Premiere Elements. OBS Studio too offers a plug-in called ‘OBS Background Removal’. You can find it on GitHub.
Unfortunately, the OBS plugin doesn’t come without its limitations. For starters, it’s highly CPU intensive. Secondly, the end result generally leaves a lot to be desired.
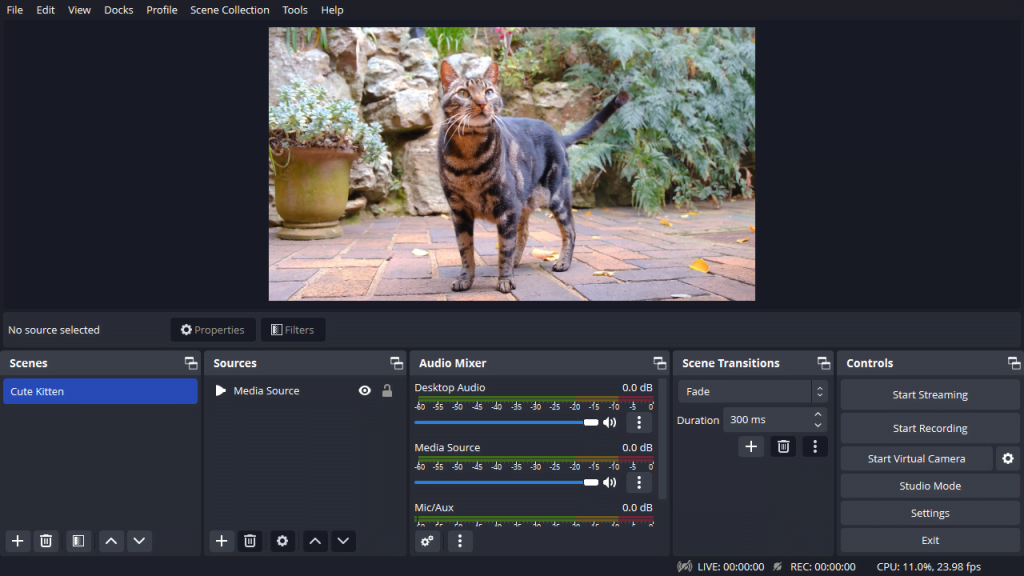
No Filter
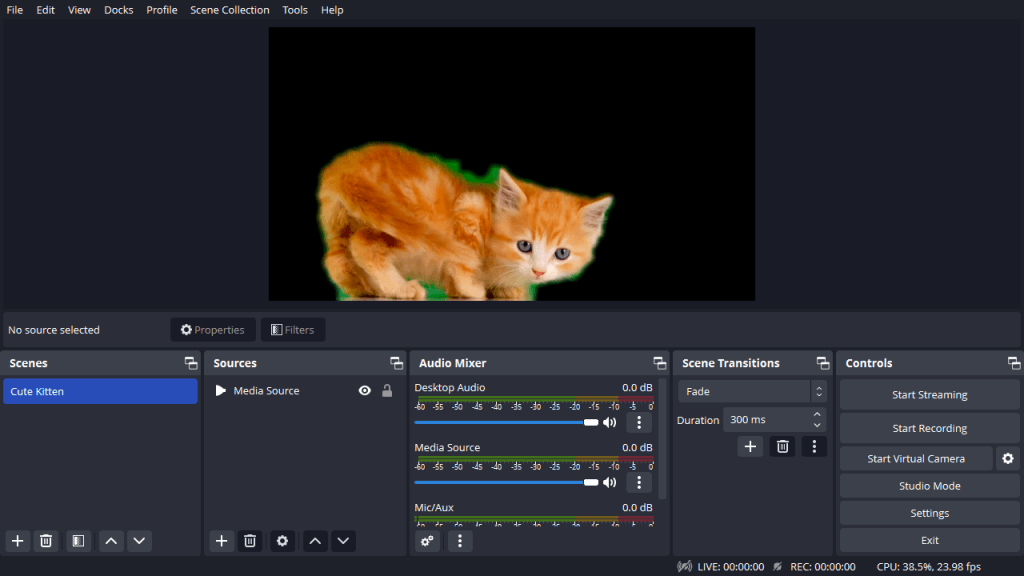
OBS Background Removal
Even under an ideal scenario with a static green screen background, the algorithm struggled to fully remove the green from the kitten, especially around her fur and paws.
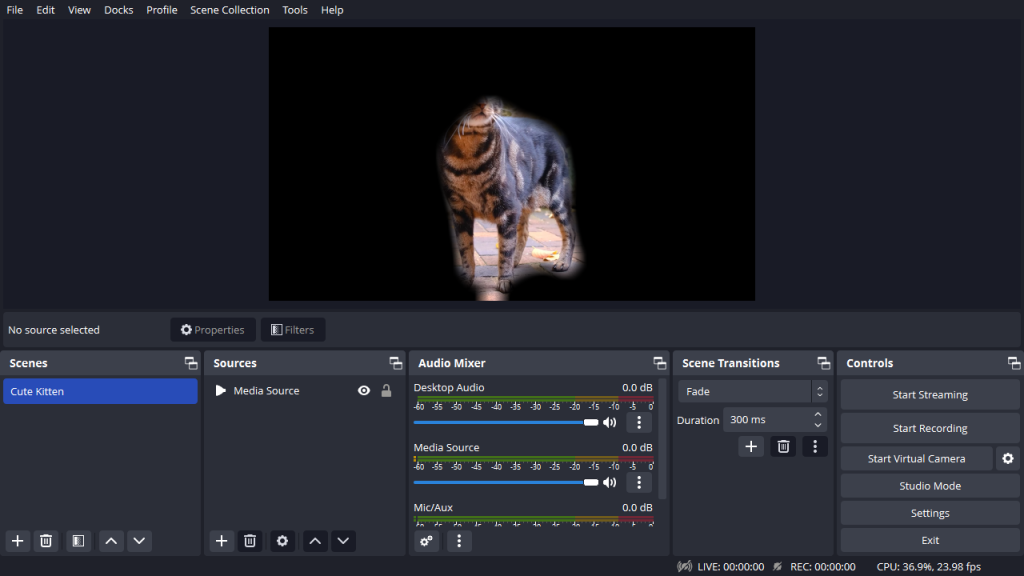
No Filter
OBS Background Removal
While the OBS Background Removal plugin and other software offering similar techniques have some potential, they still have a long way to go. For the time being, the best option by far is using a green screen + chroma key combination.
How to Set Up Green Screen on a Console
Both Xbox Series S and X consoles don’t offer a chroma key option. The only way is to connect them to your PC with an HDMI capture card and run the green screen set up. However, it’s possible to set up green screen on the PS5:
- First, make sure that your PS5 HD Camera is connected to the console
- Go into: Settings > Accessories > Camera > Adjust HD Camera
- In the next window, you’ll be prompted to “position yourself so that your face fits the frame.” Do that three times for the setup to proceed
- You’ll receive a message saying: “Your HD camera is adjusted.” Simply hit ‘OK’ to continue
- Now, go back to the settings menu and scroll down to “captures and broadcasts” > broadcasts. Here, you can set video and audio settings, etc. Once done, head over to ‘Camera’
- In the camera settings, adjust the brightness, contrast, and transparency
- Next, click on “clipping mask” and select “Chroma Key”
- Lastly, adjust the chroma key from the ‘Level’ slider until your background is completely removed
7 Common Mistakes Green Screen Beginners Make
Here are some of the most common mistakes green screen beginners make:
- Using a cheap green screen. That’s never a good idea. Always use a high-quality green screen to avoid color inconsistencies, reflections, and spills.
- Using a single light source to light the green screen. This often results in uneven lighting and shadows. You need at least two, ideally three, light sources, namely key light, back light, and fill light.
- Standing too close to the green screen. This casts shadows on the backdrop and spillage on the subject. To avoid this, maintain a distance of at least 3 feet from the backdrop.
- Using a green screen with wrinkles. Another common mistake and a very bad idea as it’s extremely difficult to remove the wrinkles in post-production. Instead, iron or steam the screen before using it as a backdrop.
- Wearing green or shades of green. This confuses the chroma key algorithm. If you must wear green, then use a blue screen instead.
- Using a camera in auto mode. This may cause motion blur, ghosting, and green trails. Instead, manually set the shutter speed to 1/125 and ISO to 400.
- Using a standard camera lens with an aperture of F/8.0. This keeps the entire frame in focus. For green screen recording, use at least an F/4.0 lens so that the camera only focuses on you while blurring the green screen.
The Bottom Line
To summarize, green screening for streaming may sound like a daunting task at first, but in actuality, it’s quite simple. All you need is the right equipment and knowledge to broadcast a convincing, professional-looking livestream.
Practice makes perfect, so don’t hesitate to try exciting new things to fully spread your wings and broaden your creative horizon. Happy streaming!
- Instant Immersion: portable chroma key panel optimized for webcam background removal.
- Superior Screen: durable wrinkle-resistant fabric guarantees the cleanest key you can get.
- Pop-Up Tech: simply lift and let the pneumatic x-frame automatically lock the screen in place.
- Concealable Design: retract into the aluminum hard case and stash out of sight.
- Ultra-quick setup and teardown